# Solução para Reconhecimento Óptico de Caracteres (OCR)


# F.A.Q

Dúvidas frequentes

***Como adiciono um diretório além do CGTI para realização do OCR?***

<span style="font-weight: 400;">**Crie** o diretório em questão - recomenda-se seguir a estrutura atual, ou seja, </span>`<span style="font-weight: 400;">/srv/shares/novoSetor/ocr/</span>`<span style="font-weight: 400;"> - e **crie** o arquivo .watchmanconfig dentro de “entrada” com o texto </span><span style="font-weight: 400;">`{"settle": 10000}`. Como também **crie** os diretórios "saída" e "originais". </span><span style="font-weight: 400;">Após estas etapas, **rode o** </span><span style="font-weight: 400;">**comando** de criação das triggers</span><span style="font-weight: 400;">: Pronto, novo diretório para processamento OCR adicionado.</span>

---

***Como testar o OCR para um diretório que eu adicionei?***

<span style="font-weight: 400;">Apenas **copie/envie** o PDF para o servidor, </span>**fora do diretório .../ocr/entrada/**<span style="font-weight: 400;">. Então, logado no servidor via linha de comando, **copie** o PDF para dentro do diretório </span><span style="font-weight: 400;">.../ocr/entrada</span><span style="font-weight: 400;"> que você criou anteriormente. O PDF será processado normalmente. </span>

---

***Existe algum log da solução OCR?***

<span style="font-weight: 400;">O arquivo de LOG presente em `/var/log/ocr.log` indica o estado de cada arquivo quanto ao seu processamento.</span>

---

***Como sei que o OCR está instalado?***

<span style="font-weight: 400;">Rode o </span><span style="font-weight: 400;">comando: `ocrmypdf --version`</span>

Deve aparecer um resultado similiar a: `5.7.0`

Mensagens de comando não encontrado indicarão um problema na sua instalação, portanto, revise todas as etapas antes de continuar.

---

***Como sei que o PDF está sendo processado no servidor?***

<span style="font-weight: 400;">O último estado no LOG para o arquivo em questão deve ser "Processando". Além disso, por meio do comando </span>`<span style="font-weight: 400;">top</span>`<span style="font-weight: 400;">, você deverá ver linha(s) com a execução de </span><span style="font-weight: 400;">`gs`, `tesseract` ou `ocrmypdf`</span><span style="font-weight: 400;">. Isto indica que um ou mais arquivos estão sendo processados.</span>

---

***Por que o processamento demora tanto em arquivos grandes?***

<span style="font-weight: 400;">Quanto maior o número de páginas ou características do documento escaneado, maior o tempo necessário para o processamento.</span>

---

***Existe alguma maneira de acelerar o processamento do PDF?***

<span style="font-weight: 400;">Incrementando a quantidade de cores e memória principal da sua VM é possível processar os arquivos PDFs em menor tempo.</span>

---

***O arquivo está recebido pela solução OCR mas não está sendo processado, o que pode estar acontecendo?***

<span style="font-weight: 400;">O watchman pode não estar ativo. Caso isso ocorra, rode o comando </span>`<span style="font-weight: 400;">watchman watch-list</span>`<span style="font-weight: 400;"> e observe se os processamentos foram iniciados no log da solução OCR. Caso não haja entradas no log, verifique o log do watchman: </span>

`<span style="font-weight: 400;">$ tail -f /usr/local/var/run/watchman/root-state/log</span><span style="font-weight: 400;">.</span>`

Mensagens de erro podem ser consultadas no Google para dúvidas.

<span style="font-weight: 400;">Caso o watchman esteja OK e ainda haja problemas para processar o arquivo, verifique se existe disco e memória suficientes para realizar esta operação. </span>

---

***Ao mover um arquivo PDF de dentro do próprio servidor, o OCR funciona. Mas enviando do meu usuário via rede (samba, sftp, outro meio) o OCR não acontece, o que posso verificar?***

<span style="font-weight: 400;">Problemas de permissão local. Siga as políticas definidas para o acesso aos diretórios e certifique-se de que ao enviar o PDF via rede, as permissões estejam adequadas e ajustadas para atender a sua política adotada no campus. </span>

<span style="font-weight: 400;">Adicionalmente, alguns softwares de envio de arquivos, ou mesmos os servidores de arquivos, possuem mecanismos para ajustar as permissões padrão para novos arquivos enviados.</span>

# Instalação da solução OCR

### 1. Introdução

<span style="font-weight: 400;">Este documento visa a orientação para a instalação da solução OCR a ser utilizada no Instituto Federal de Pernambuco para reconhecimento óptico de caracteres em documentos digitalizados. Tal tecnologia permite a busca, indexação de arquivos PDF, como também assistência a deficientes visuais por meio de softwares assistivos.</span>

<span style="font-weight: 400;">Este documento está estruturado como se segue. A seção 2 descreve as características dos softwares utilizados para a solução, na seção 3 demonstra-se os procedimentos de instalação do OCRmyPDF e demais softwares. A seção 4 apresenta as configurações/modificações necessárias para o funcionamento do sistema, incluindo a configuração da impressora caso a TI opte por esta solução. Na seção 5 é demonstrado o uso da solução, e, finalmente, na seção 6 são apresentadas as referências utilizadas.</span>

#### <span style="color: #555555;">Características</span>

- <span style="font-weight: 400;">Processamento OCR;</span>
- <span style="font-weight: 400;">Texto em língua portuguesa do Brasil;</span>
- <span style="font-weight: 400;">Arquivos com saída PDF do tipo PDF/A-1b;</span>
- <span style="font-weight: 400;">Possibilidade de monitoramento de um ou mais diretórios de entrada;</span>
- <span style="font-weight: 400;">Processamento de PDFs mistos (com texto digital e texto escaneado);</span>
- <span style="font-weight: 400;">Processamento de documentos grandes (&gt; 50 pag.);</span>
- <span style="font-weight: 400;">Manutenção dos arquivos PDF originais;</span>
- <span style="font-weight: 400;">Log para registro do processamento da solução OCR.</span>

###  2. Softwares utilizados

<p class="callout info"> <span class="c1">O sistema operacional recomendado é o </span>**<span class="c1 c5">Debian</span>**<span class="c1"> a partir da </span>**<span class="c1 c5">versão 9</span>**<span class="c3 c1">.</span></p>

#### <span style="color: #555555;">OCRmyPDF</span>

<span style="font-weight: 400;">O OCRmyPDF realiza a leitura de documentos escaneados em PDF e permite o reconhecimento do seu texto. Assim, podendo ser buscado e indexado. Além disso, os documentos são automaticamente gerados em formato </span><span style="font-weight: 400;">PDF/A, para arquivamento de longo prazo de documentos eletrônicos. O OCRmyPDF gera documentos no formato PDF/A-1b e PDF/A-2b.</span>

#### <span style="color: #555555;">Watchman</span> 

<span style="font-weight: 400;">O Watchman permite monitorar determinado(s) diretório(s) com o objetivo de realizar operações quando os arquivos são modificados. É possível filtrar os tipos de arquivos com base no nome, tipo, dentre outras características. </span>

<span style="font-weight: 400;">Como o OCRmyPDF não funciona com base no esquema de cliente-servidor até o presente momento, é necessário um software como o Watchman para monitorar determinadas entradas e disparar comandos para executar o processamento dos arquivos inseridos ou modificados.</span>

<span style="font-weight: 400;">Na imagem seguinte, uma demonstração do fluxo de operação de todo o sistema caso a TI local opte pelo uso de um servidor de arquivos como o Samba.</span>

<span style="font-weight: 400;">[![OCR-com-SMB.png](https://wiki.ifpe.edu.br/uploads/images/gallery/2018-03-Mar/scaled-840-0/OCR-com-SMB.png)](https://wiki.ifpe.edu.br/uploads/images/gallery/2018-03-Mar/OCR-com-SMB.png)</span>

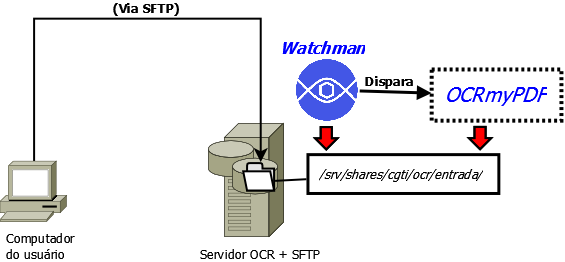
<span style="font-weight: 400;">Na imagem seguinte, uma demonstração do fluxo de operação de todo o sistema caso a TI local opte pelo uso de um servidor de SFTP.</span>

<span style="font-weight: 400;">[![OCR-com-SFTP.png](https://wiki.ifpe.edu.br/uploads/images/gallery/2018-03-Mar/scaled-840-0/OCR-com-SFTP.png)](https://wiki.ifpe.edu.br/uploads/images/gallery/2018-03-Mar/OCR-com-SFTP.png)</span>

---

![](https://wiki.ifpe.edu.br/images/image10.png)<span style="font-weight: 400;">O método de envio do arquivo para a pasta de entrada não está no escopo desta solução.</span>

#### Vozes NextUp-ScanSoft 

**Se desejar**, este é um pacote de fala disponibilizado pela NextUp com uma voz feminina chamada Raquel. Este pacote é destinado ao uso nos clientes e não é necessária sua instalação no lado do servidor OCR. Atualmente, o software não faz mais parte do portfólio da empresa, mas a instalação é permitida e sem custos com o instalador disponível na Web. O pacote é utilizado por softwares como Adobe Reader e Foxit PDF Reader para a leitura do texto.

### 3. Instalação

####  OCRmyPDF 

<span style="font-weight: 400;">A última versão do OCRmyPDF disponível nos repositórios Debian/Ubuntu é bem anterior a versão já disponibilizada no repositório oficial dos desenvolvedores. Assim, não contempla as últimas atualizações necessárias ao bom funcionamento do pacote no que se refere a demanda de OCR do IFPE. </span>**Portanto, será demonstrada a instalação via compilação do código fonte.**

<span style="font-weight: 400;">Logado como </span>***root***<span style="font-weight: 400;">, execute os comandos:</span>

```Instalar
$ apt-get update
$ apt-get install python3-pip
$ apt-get install libffi-dev
$ apt-get install tesseract-ocr
$ apt-get install ghostscript
$ apt-get install qpdf
$ apt-get install git
$ pip3 install git+https://github.com/jbarlow83/OCRmyPDF.git
```

<span class="c1">Para dar suporte ao idioma </span><span class="c1 c5">Português do Brasil</span><span class="c3 c1">, instale o pacote abaixo:</span>

```c18
 $ apt-get install tesseract-ocr-por -y
```

<span class="c3 c1">Com o OCRmyPDF instalado, faça o teste com algum arquivo PDF escaneado:</span>

```c18
$ ocrmypdf entrada.pdf saida.pdf --output-type pdfa-1 -l por
```

<p class="callout info"> <span class="c1">Os argumentos </span><span class="c1 c43 c5">`--output-type pdfa-1 -l` por</span><span class="c3 c1"> significam respectivamente o tipo de PDF/A gerado e o idioma a ser considerado na interpretação do texto presente no documento PDF.</span> </p>

#### <span style="color: #555555;">Watchman</span>

 <span class="c1">Ainda como </span><span class="c1 c19 c5">***root***, </span><span class="c1">instale alguns pacotes de dependência:</span>

```
$ apt-get install gcc
$ apt-get install autoconf
$ apt-get install automake
$ apt-get install build-essential
$ apt-get install libtool
$ apt-get install libssl-dev
$ apt-get install pkg-config
$ apt-get install python-dev
$ apt-get install python3-dev
```

<span class="c1">Agora procede-se a instalação do Watchman (como </span>***<span class="c1 c19 c5">root</span>***<span class="c3 c1">):</span>

```c18
$ git clone https://github.com/facebook/watchman.git
$ cd watchman
$ git checkout v4.9.0
$ ./autogen.sh
$ ./configure
$ make
$ make install
```

####  <span style="color: #555555;">NextUp-ScanSoft Raquel</span> 

<span class="c3 c1">Apenas baixe e instale o software (Windows) por meio do link abaixo:</span>

<table class="c46" id="bkmrk-https%3A%2F%2Fdrive.google"><tbody><tr class="c58"><td class="c35" colspan="1" rowspan="1"><span class="c9 c1">https://drive.google.com/file/d/0B3aNFZuG\_Yw9cjRCNUJBOUQ3QVk/view?usp=sharing</span>

</td></tr></tbody></table>

#### <span style="color: #555555;">Desinstalação</span>

<span class="c3 c1">Caso seja necessário remover alguns dos softwares para manutenção/atualização, realize os seguintes comandos à seguir. **Para remoção do OCRmyPDF**:</span>

```
 $ pip3 uninstall ocrmypdf
```

**Para a remoção do Watchman**, seria necessário excluir os binários, portanto, não se recomenda esta prática. Entretanto, caso necessite atualizar o Watchman, basta realizar a nova instalação que os binários serão sobrescritos com a nova versão.

---

### 4. Configuração 

<span class="c3 c1">A configuração para a solução OCR fica praticamente com o Watchman e a impressora, já que a utilização do OCRmyPDF é bem simples. Considere a seguinte estrutura:</span>

```c12
root@t-ifpe-ocr-beta:/# tree /srv
/srv
└── shares
    ├── ascom
    │   └── ocr
    │       ├── entrada
    │       ├── originais
    │       └── saida
    ├── cgti
    │   └── ocr
    │       ├── entrada
    │       ├── originais
    │       └── saida
    └── dae
        └── ocr
            ├── entrada
            ├── originais
            └── saida
```

#### Watchman

<span style="font-weight: 400;">O Watchman irá monitorar todos os diretórios “entrada” e dispara um script quando um novo arquivo PDF for criado. No exemplo abaixo, iremos criar três triggers. Para cada diretório “entrada”, **crie o diretório e em seguida o seguinte arquivo** de configuração do Watchman, exemplo para </span>**cgti**<span style="font-weight: 400;">:</span>

```watchman
$ mkdir -p /srv/shares/cgti/ocr/entrada/
$ mkdir -p /srv/shares/cgti/ocr/saida/
$ mkdir -p /srv/shares/cgti/ocr/originais/

$ nano /srv/shares/cgti/ocr/entrada/.watchmanconfig
{"settle": 10000}
```

<p class="callout warning">Sobre os diretórios criados, é importante trabalhar corretamente as permissões de usuário e grupo de acordo com o seu serviço de rede e políticas de acesso.</p>

<span style="font-weight: 400;">A função do arquivo </span>`<span style="font-weight: 400;">.watchmanconfig</span>`<span style="font-weight: 400;"> é passar configurações específicas do diretório ao watchman. Neste caso, a opção "</span>*<span style="font-weight: 400;">settle"</span>*<span style="font-weight: 400;"> impede que o PDF seja processado antes de sua completa transferência para o diretório. **Crie em cada diretório "entrada" antes de executar o próximo comando** de criação dos triggers.</span>

<span style="font-weight: 400;">Os triggers são criados e invocam o script no diretório **/srv/** - o script pode estar em outro local, só necessita de permissão de execução do root. **Crie as triggers**:</span>

```Watchman
$ watchman -- trigger /srv/shares/cgti/ocr/entrada/ 'ocrTrigCgti' '*.pdf' -- /srv/doOcr.sh
$ watchman -- trigger /srv/shares/dae/ocr/entrada/ 'ocrTrigDae' '*.pdf' -- /srv/doOcr.sh
$ watchman -- trigger /srv/shares/ascom/ocr/entrada/ 'ocrTrigAscom' '*.pdf' -- /srv/doOcr.sh
```

 <span class="c3 c1">Detalhes:</span>

- <span class="c1">/srv/shares/</span><span class="c1 c29">cgti</span><span class="c3 c1">/ocr/entrada/ : diretório observado;</span>
- <span class="c3 c1">'ocrTrigCgti': nome do trigger;</span>
- <span class="c3 c1">'\*.pdf': filtro aplicado para o trigger;</span>
- <span class="c3 c1">/srv/doOcr.sh: script a ser invocado quando o Watchman identificar alguma alteração no diretório monitorado;</span>
- <span class="c3 c1">Importante não esquecer os dois hífens duplos no comando “--”.</span>

 <span class="c3 c1">Agora observe o script que está sendo utilizado, **copie e cole no mesmo caminho**, ou seja, /srv/doOcr.sh:</span>

```c12
#!/bin/bash

# Escreve no log. Recebe o nome do arquivo e a ação realizada.
logIt(){
echo -e "$(date +%d/%m/%Y-%T)\t" $1"\t"$2 >> /var/log/ocr.log
}

# Realiza o OCR. Recebe o nome do arquivo de entrada.
ocrFile(){
  logIt "$arg" "Processando"
  filename=$(echo "$1" | cut -f 1 -d '.') # sem extensão
  entrada="$1"
  saida="$filename"-ocr.pdf

  ocrmypdf "$entrada" ../saida/"$saida" -l por --output-type pdfa-1 --skip-text

  chmod g=rw,o= ../saida/"$saida"
  logIt "$arg" "OCR realizado"
  mv "$arg" ../originais
}

# Fluxo principal
for arg in "$@"
do
    if [ -f "$arg" ]; # arquivo existe ?
    then
       logIt "$arg" "Arquivo recebido"
       ocrFile "$arg" &
    fi
done
```

<p class="callout warning"><span class="c3 c13">Caso copie e cole o script acima, antes, edite o texto e organize as linhas e aspas duplas (“ ”).</span></p>

<span class="c3 c13">Dê permissões de execução para o script.</span>

```c12
$ chmod +x /srv/doOcr.sh
```

#### <span style="color: #555555;">Ativando a auto-inicialização</span>

<span style="color: #555555;">O watchman deve monitorar os diretórios assim que o S.O. for iniciado. De forma a permitir que esta função seja realizada, **deve-se adicionar o comando de inicialização do watchman** aos comandos executados após o início do S.O.</span>

<span style="color: #555555;">Para realizar isto, basta seguir o tutorial de [scripts de inicialização com system V](https://wiki.ifpe.edu.br/books/tecnologia-da-informa%C3%A7%C3%A3o-redes/page/scripts-de-inicializa%C3%A7%C3%A3o-com-system-v) que está na WIKI do IFPE. Atente para as variáveis do script que neste caso do watchman devem ser:</span>

`dir="/usr/local/bin/"`

`cmd="watchman -f"`

`user="root" `

#### <span style="color: #555555;">Impressora</span>

<span style="font-weight: 400;">Será demonstrada configuração na impressora Kyocera FS-1135 enviando o PDF para um servidor de arquivos. Para outras impressoras, as configurações são semelhantes, com algumas pequenas diferenças que podem ocorrer na forma como o S.O. da impressora trata os dados inseridos. </span>

<p class="callout warning"><span class="c4 c1">A impressora deve estar conectada diretamente à rede.</span></p>

 <span class="c3 c1">Acesse o painel WEB da impressora:</span>

<span style="overflow: hidden; display: inline-block; margin: -0.00px -0.00px; border: 2.67px solid #000000; transform: rotate(0.00rad) translateZ(0px); -webkit-transform: rotate(0.00rad) translateZ(0px); width: 473.91px; height: 298.17px;">![](https://wiki.ifpe.edu.br/images/image12.png)[![image12.png](https://wiki.ifpe.edu.br/uploads/images/gallery/2017-12-Dec/scaled-840-0/image12.png)](https://wiki.ifpe.edu.br/uploads/images/gallery/2017-12-Dec/image12.png)</span>

S<span class="c3 c1">erão criados “contatos” na agenda da impressora com configurações pré-definidas para salvar os documentos escaneados. Desta forma, evita-se a inserção manual das configurações de acesso ao servidor de arquivos. Na Kyocera, por exemplo, um contato pode conter informações FTP, SMB e de e-mail para o envio do PDF gerado.</span>

<span class="c3 c1">Acesse o menu “Básico”, depois, nas opções do lado esquerdo, clique “Bloco de endereços” e em seguida “Contatos”. Crie um novo contato clicando em “Adicionar Contato”.</span>

<span style="overflow: hidden; display: inline-block; margin: -0.00px -0.00px; border: 2.67px solid #000000; transform: rotate(0.00rad) translateZ(0px); -webkit-transform: rotate(0.00rad) translateZ(0px); width: 471.00px; height: 381.93px;">![](https://wiki.ifpe.edu.br/images/image5.png)[![image5.png](https://wiki.ifpe.edu.br/uploads/images/gallery/2017-12-Dec/scaled-840-0/image5.png)](https://wiki.ifpe.edu.br/uploads/images/gallery/2017-12-Dec/image5.png)</span>

 <span class="c3 c1">Tem-se várias opções de envio, será escolhido o protocolo SMB.</span>

<span style="overflow: hidden; display: inline-block; margin: -0.00px 0.00px; border: 2.67px solid #000000; transform: rotate(0.00rad) translateZ(0px); -webkit-transform: rotate(0.00rad) translateZ(0px); width: 612.00px; height: 326.25px;">![](https://wiki.ifpe.edu.br/images/image13.png)[![image13.png](https://wiki.ifpe.edu.br/uploads/images/gallery/2017-12-Dec/scaled-840-0/image13.png)](https://wiki.ifpe.edu.br/uploads/images/gallery/2017-12-Dec/image13.png)</span>

- <p class="callout info">**<span class="c1 c5">Nome de host</span>**<span class="c3 c1">: IP ou hostname do servidor de arquivos;</span></p>
- <p class="callout info">**<span class="c1 c5">Número da porta</span>**<span class="c3 c1">: porta que o servidor de arquivos escuta para receber arquivos;</span></p>
- <p class="callout info">**<span class="c1 c5">Caminho</span>**<span class="c3 c1">: utilizando contra-barras, o nome do compartilhamento seguido dos sub-diretórios para onde serão enviados os arquivos PDF;</span></p>
- <p class="callout info">**<span class="c1 c5">Nome de login</span>**<span class="c1">: usuário e DOMÍNIO no formato usuario@dominio. </span>**<span class="c4 c1">Recomenda-se a criação de um usuário no seu domínio para cada impressora.</span>**</p>
- <p class="callout info">**<span class="c1 c5">Senha de login</span>**<span class="c3 c1">: senha do usuário no DOMÍNIO.</span> </p>

<span class="c3 c1">Clicar em **Enviar** para salvar as configurações. Posteriormente, para escanear e mandar para o servidor de arquivos, seguir as próximas configurações.</span>

#### <span style="color: #555555;">Envio dos arquivos</span>

<span style="font-weight: 400;">A configuração do envio dos arquivos foge do escopo deste tutorial. Mas o importante é que os usuários criados para o envio dos arquivos tenham permissões de </span>**escrita (write)** <span style="font-weight: 400;">no diretório “entrada” configurado. **O script (**</span>**/srv/doOcr.sh**<span style="font-weight: 400;">**) deve ter configurações de execução habilitadas** para que o Watchman consiga dispará-lo, bem como os usuários do domínio devem ter no mínimo acesso de leitura no diretório de “saída”.</span>

<span style="font-weight: 400;">Recomenda-se uma política de manutenção dos arquivos que ficarão no diretório originais. Pode-se movê-los para um backup ou executar algum script periódico para limpar arquivos antigos.</span>

#### <span style="color: #555555;">LOG</span>

<span style="font-weight: 400;">O log de processamento dos arquivos da solução OCR se encontrará disponível no caminho </span><span style="font-weight: 400;">/var/log/ocr.log</span><span style="font-weight: 400;">. O estado possíveis para arquivo é:</span>

- **Arquivo recebido**<span style="font-weight: 400;"> - o arquivo foi recebido e detectado pelo watchman que já invocou o script </span><span style="font-weight: 400;">doOcr.sh</span><span style="font-weight: 400;">.</span>
- **Processando** <span style="font-weight: 400;">- o OCRmyPDF está processando o arquivo.</span>
- **OCR realizado**<span style="font-weight: 400;">. - o arquivo foi processado pelo OCRmyPDF com sucesso e movido para o diretório “saida”.</span>

### 5. Atualização a partir de uma versão anterior

Se já existia uma versão anterior da solução OCR implantada, basta realizar a atualização de alguns pontos.

**Atualize o OCRmyPDF:**

```Atualizar
$ apt-get update
$ apt-get install python3-pip
$ apt-get install libffi-dev
$ apt-get install tesseract-ocr
$ apt-get install ghostscript
$ apt-get install qpdf
$ apt-get install git
$ pip3 install git+https://github.com/jbarlow83/OCRmyPDF.git@v5.7.0
$ apt-get install tesseract-ocr-por -y
```

**Delete as triggers antigas do** **watchman**, exemplo para **cgti**:

```Deletar
$ watchman watch-del /srv/shares/cgti/ocr/entrada
```

**Crie** o arquivo .watchmanconfig no(s) diretório(s) de entrada do OCR**,** exemplo para **cgti:**

```Arquivo
$ nano /srv/shares/cgti/ocr/entrada/.watchmanconfig
{"settle": 10000}
```

**Faça uma cópia e atualize** o script de execução doOcr.sh para esta versão abaixo**:**

```Backup
$ cp /srv/doOcr.sh /srv/doOcr.sh-bkp

$ nano /srv/doOcr.sh


<<<<<<<<<insira o conteúdo abaixo>>>>>>>>>>>>>>>>>>>>>>>


#!/bin/bash

# Escreve no log. Recebe o nome do arquivo e a ação realizada.
logIt(){
echo -e "$(date +%d/%m/%Y-%T)\t" $1"\t"$2 >> /var/log/ocr.log
}

# Realiza o OCR. Recebe o nome do arquivo de entrada.
ocrFile(){
  logIt "$arg" "Processando"
  filename=$(echo "$1" | cut -f 1 -d '.') # sem extensão
  entrada="$1"
  saida="$filename"-ocr.pdf

  ocrmypdf "$entrada" ../saida/"$saida" -l por --output-type pdfa-1 --skip-text

  chmod g=rw,o= ../saida/"$saida"
  logIt "$arg" "OCR realizado"
  mv "$arg" ../originais
}

# Fluxo principal
for arg in "$@"
do
    if [ -f "$arg" ]; # arquivo existe ?
    then
       logIt "$arg" "Arquivo recebido"
       ocrFile "$arg" &
    fi
done
```

**Crie novamente as triggers do** **watchman**, exemplo para **cgti:**

```Watchman
$ watchman -- trigger /srv/shares/cgti/ocr/entrada/ 'ocrTrigCgti' '*.pdf' -- /srv/doOcr.sh
```

### 6. Operação com scanner

<span style="font-weight: 400;">Aqui é demonstrado o envio dos arquivos de uma impressora para o servidor de arquivos local.</span>

#### Scanner

 <span style="overflow: hidden; display: inline-block; margin: -0.00px -0.00px; border: 2.67px solid #000000; transform: rotate(0.00rad) translateZ(0px); -webkit-transform: rotate(0.00rad) translateZ(0px); width: 490.65px; height: 275.27px;">![](https://wiki.ifpe.edu.br/images/image3.jpg)[![image3.jpg](https://wiki.ifpe.edu.br/uploads/images/gallery/2017-12-Dec/scaled-840-0/image3.jpg)](https://wiki.ifpe.edu.br/uploads/images/gallery/2017-12-Dec/image3.jpg)</span>

<span class="c3 c1">Apertar o botão “Enviar”.</span>

 <span style="overflow: hidden; display: inline-block; margin: -0.00px -0.00px; border: 2.67px solid #000000; transform: rotate(0.00rad) translateZ(0px); -webkit-transform: rotate(0.00rad) translateZ(0px); width: 492.29px; height: 275.83px;">![](https://wiki.ifpe.edu.br/images/image4.jpg)[![image4.jpg](https://wiki.ifpe.edu.br/uploads/images/gallery/2017-12-Dec/scaled-840-0/image4.jpg)](https://wiki.ifpe.edu.br/uploads/images/gallery/2017-12-Dec/image4.jpg)</span>

<span class="c3 c1">Apertar o botão de contatos, ou “Libro de direcciones” como neste caso. Tem a função de acesso a Agenda.</span>

[![image2.jpg](https://wiki.ifpe.edu.br/uploads/images/gallery/2017-12-Dec/scaled-840-0/image2.jpg)](https://wiki.ifpe.edu.br/uploads/images/gallery/2017-12-Dec/image2.jpg)![](https://wiki.ifpe.edu.br/images/image2.jpg)

<span class="c3 c1">Selecione o contato previamente salvo na agenda e apertão o botão “Ok”.</span>

[![image8.jpg](https://wiki.ifpe.edu.br/uploads/images/gallery/2017-12-Dec/scaled-840-0/image8.jpg)](https://wiki.ifpe.edu.br/uploads/images/gallery/2017-12-Dec/image8.jpg)

<span class="c3 c1">Aperte “Ok” para confirmar o endereço. Em seguida, apertar o botão verde principal para dar início a digitalização.</span>

[![image11.jpg](https://wiki.ifpe.edu.br/uploads/images/gallery/2017-12-Dec/scaled-840-0/image11.jpg)](https://wiki.ifpe.edu.br/uploads/images/gallery/2017-12-Dec/image11.jpg)

<p class="callout success"><span class="c3 c1">Se não aparecer nenhuma mensagem de erro ou o LED vermelho não piscar, houve sucesso no escaneamento.</span>![](https://wiki.ifpe.edu.br/images/image6.png)</p>

[![image6.png](https://wiki.ifpe.edu.br/uploads/images/gallery/2017-12-Dec/scaled-840-0/image6.png)](https://wiki.ifpe.edu.br/uploads/images/gallery/2017-12-Dec/image6.png)

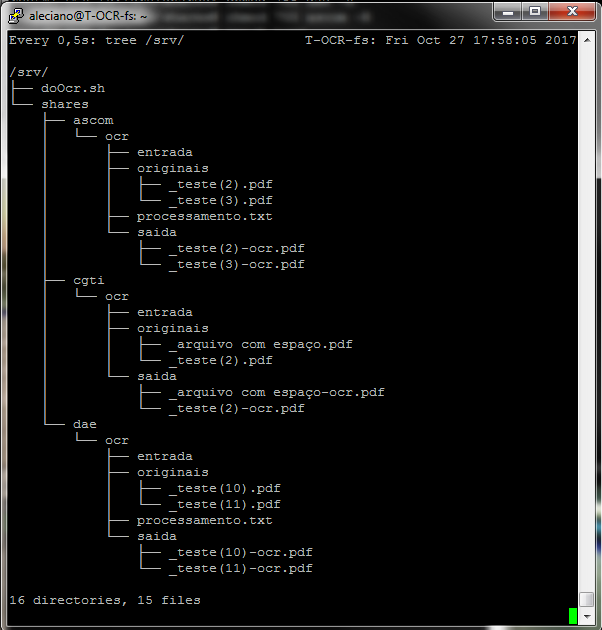
 <span class="c3 c1">Diretório “Ascom”, na estrutura, indicando sucesso no escaneamento e no processamento OCR.</span>

<p class="callout info"><span class="c3 c1"><span class="c4 c1">O OCRmyPDF pode levar alguns minutos para processar o arquivo PDF. </span></span></p>

#### <span style="color: #555555;">Visualização (texto)</span>

 <span class="c3 c1">O arquivo com reconhecimento OCR e padrão PDF/A-1b ou 2b, aparece da seguinte forma em softwares como Adobe Reader. Como é possível notar, o texto é selecionável.</span>

#### Visualização (áudio da leitura)

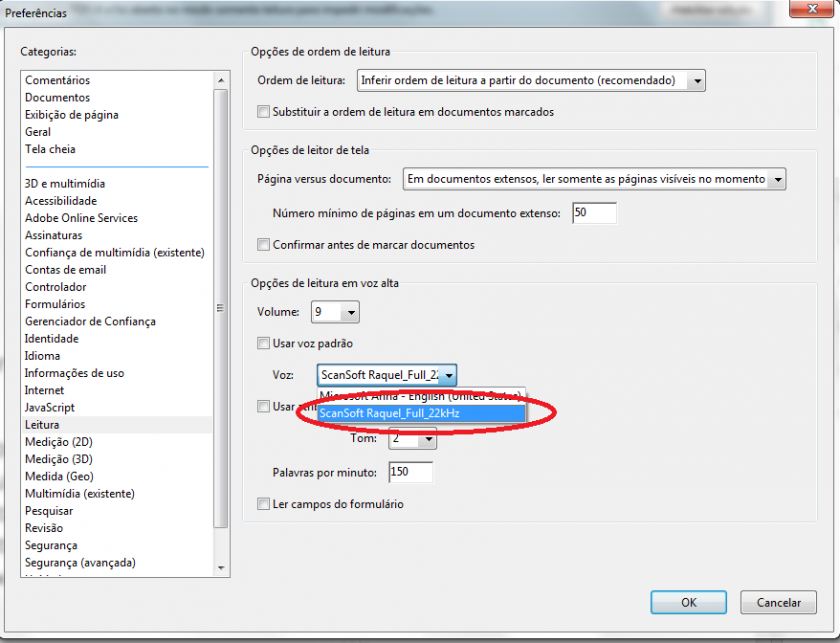
 <span class="c1">Utilizando o software Adobe Reader como exemplo, acesse as Preferências do software, ative o recurso de Leitura do texto e selecione a voz “Raquel” para uso.</span>

[![image9.png](https://wiki.ifpe.edu.br/uploads/images/gallery/2017-12-Dec/scaled-840-0/image9.png)](https://wiki.ifpe.edu.br/uploads/images/gallery/2017-12-Dec/image9.png)

<span class="c1">Para escutar a leitura do texto pelo software, pressione os atalhos Shift + Ctrl + Y (</span><span class="c1 c5">Ativar leitura em voz alta</span><span class="c1">) e Shift + Ctrl + B (</span><span class="c1 c5">Ler todo o documento</span><span class="c3 c1">). Também, é possível escutar clicando no texto ou percorrendo com o cursor do mouse.</span>

 <span class="c3 c1">Leitura do arquivo com OCR em ação:</span>

<span style="overflow: hidden; display: inline-block; margin: -0.00px 0.00px; border: 2.67px solid #000000; transform: rotate(0.00rad) translateZ(0px); -webkit-transform: rotate(0.00rad) translateZ(0px); width: 532.85px; height: 423.67px;">![](https://wiki.ifpe.edu.br/images/image7.png)[![image7.png](https://wiki.ifpe.edu.br/uploads/images/gallery/2017-12-Dec/scaled-840-0/image7.png)](https://wiki.ifpe.edu.br/uploads/images/gallery/2017-12-Dec/image7.png)</span>

<span class="c25 c1">[https://www.youtube.com/watch?v=xrBu4fhoXFE&amp;feature=youtu.be](https://www.google.com/url?q=https://www.youtube.com/watch?v%3DxrBu4fhoXFE%26feature%3Dyoutu.be&sa=D&ust=1513610665960000&usg=AFQjCNHz55Qd-BCWilDs-l_6h-LlO_Uhhw)</span>

---

### 7. Referências

 <span class="c1 c25">[https://pt.wikipedia.org/wiki/PDF/A](https://www.google.com/url?q=https://pt.wikipedia.org/wiki/PDF/A&sa=D&ust=1513610665962000&usg=AFQjCNETBMvgm_YZwumaqIGM7nyBJ-Xqig)</span>

<span class="c25 c1">[https://softwarepublico.gov.br/archives/thread/sei-negocio/como-criar-pdfa-conforme-iso-19005-12005](https://www.google.com/url?q=https://softwarepublico.gov.br/archives/thread/sei-negocio/como-criar-pdfa-conforme-iso-19005-12005&sa=D&ust=1513610665962000&usg=AFQjCNHVYFXJb2z-zld7EdWj4FI3sHYe_A)</span>

 <span class="c25 c1">[http://www.admin-magazine.com/Archive/2015/26/Look-for-file-changes-and-kick-off-actions-with-Watchman/(offset)/3](https://www.google.com/url?q=http://www.admin-magazine.com/Archive/2015/26/Look-for-file-changes-and-kick-off-actions-with-Watchman/(offset)/3&sa=D&ust=1513610665963000&usg=AFQjCNHKgfomOHvdD4knmrnoIq5baRUnGA)</span>

 <span class="c25 c1">[https://ocrmypdf.readthedocs.io/en/latest/index.html](https://www.google.com/url?q=https://ocrmypdf.readthedocs.io/en/latest/index.html&sa=D&ust=1513610665964000&usg=AFQjCNHmZWef3SZK74aU8g0B2MJUltb8mQ)</span>

 <span class="c25 c1">[http://facebook.github.io/watchman/](https://www.google.com/url?q=http://facebook.github.io/watchman/&sa=D&ust=1513610665965000&usg=AFQjCNEFUuPIRF2qQcWhakf8RxYGminPqA)</span><span class="c25 c1 c5">[ ](https://www.google.com/url?q=http://facebook.github.io/watchman/&sa=D&ust=1513610665965000&usg=AFQjCNEFUuPIRF2qQcWhakf8RxYGminPqA)</span>

 <span class="c25 c1">[https://stackoverflow.com/questions/1659147/how-to-use-ghostscript-to-convert-pdf-to-pdf-a-or-pdf-x](https://www.google.com/url?q=https://stackoverflow.com/questions/1659147/how-to-use-ghostscript-to-convert-pdf-to-pdf-a-or-pdf-x&sa=D&ust=1513610665966000&usg=AFQjCNEfK4IgJP2Yuj41FkdLGEd0CrfbGw)</span>

 <span class="c25 c1">[https://www.pdf-online.com/osa/validate.aspx](https://www.google.com/url?q=https://www.pdf-online.com/osa/validate.aspx&sa=D&ust=1513610665966000&usg=AFQjCNFw516pjWYyFmyV8dgy0mnEuyZDKA)</span>

 <span class="c25 c1">[http://www.tecassistiva.com.br/servicos?id=105](https://www.google.com/url?q=http://www.tecassistiva.com.br/servicos?id%3D105&sa=D&ust=1513610665967000&usg=AFQjCNE3hKceJ46fu0Qt1YKhV5j1ksUeGg)</span>

# Solução OCR em OVA

### Introdução

Este documento visa a orientação sobre as configurações aplicadas na máquina virtual (VM) da solução OCR versão 1.2.1 Serão apresentadas as configurações de sistema, particionamento, rede, usuários e particularidades da solução OCR.

As CGTIs devem alterar configurações para satisfazer suas necessidades locais. A DADT entrega uma versão simplificada e funcional, com exemplos, demonstrando o serviço. À partir da entrega da VM, a CGTI fica responsável por sua manutenção e uso. Não se responsabilizando a DADT por eventuais problemas decorridos de alterações realizadas pelas coordenações locais de TI dos campi.

### Características da VM

- <span style="font-weight: 400;">VM Version: 8</span>
- <span style="font-weight: 400;">CPU: 2 vCPU</span>
- <span style="font-weight: 400;">Memória: 1024 MB</span>
- Disco provisionado: 5 GB

<p class="callout warning"><span style="font-weight: 400;">O tamanho do disco é pequeno para facilitar o download e implantação da solução. Recomenda-se fortemente que **o disco seja expandido** para evitar falta de espaço em algumas partições.</span></p>

- <span style="font-weight: 400;">Sistema operacional: Debian 9.1, 64 Bits</span>
- <span style="font-weight: 400;">Sistema de armazenamento: LVM (Logical Volume Management). Utilizado por permitir flexibilidade na extensão das partições – útil para quando os discos ficam cheios e for necessário expandi-lo.</span>

<span style="font-weight: 400;">O volume físico está em </span>*<span style="font-weight: 400;">/dev/sda5</span>*<span style="font-weight: 400;">:</span>

<table id="bkmrk-%24-sudo-pvs-pv-%C2%A0%C2%A0%C2%A0" style="width: 600px; height: 97px;"><tbody><tr><td style="width: 605px;"><span style="font-weight: 400;">$ sudo pvs</span>

</td></tr><tr><td style="width: 605px;"><span style="font-weight: 400;">PV VG Fmt Attr PSize PFree</span>

<span style="font-weight: 400;">/dev/sda5 linux lvm2 a-- 4,52g 0</span>

</td></tr></tbody></table>

<span style="font-weight: 400;">Apresenta grupo de volumes (</span>*<span style="font-weight: 400;">linux</span>*<span style="font-weight: 400;">) com um volume físico e três volumes lógicos:</span>

<table id="bkmrk-%24-sudo-vgs-%C2%A0vg-%C2%A0%C2%A0" style="height: 89px;" width="600"><tbody><tr><td style="width: 599px;"><span style="font-weight: 400;">$ sudo vgs</span>

</td></tr><tr><td style="width: 599px;"><span style="font-weight: 400;"> VG #PV #LV #SN Attr VSize VFree</span>

<span style="font-weight: 400;"> linux 1 3 0 wz--n- 4,52g 0</span>

</td></tr></tbody></table>

<span style="font-weight: 400;">Volumes lógicos são </span>*<span style="font-weight: 400;">root</span>*<span style="font-weight: 400;">, </span>*<span style="font-weight: 400;">srv</span>*<span style="font-weight: 400;"> e </span>*<span style="font-weight: 400;">swap</span>*<span style="font-weight: 400;">:</span>

<table id="bkmrk-%24-sudo-lvs-%C2%A0lv-%C2%A0%C2%A0" style="height: 150px;" width="600"><tbody><tr><td style="width: 599px;"><span style="font-weight: 400;">$ sudo lvs</span>

</td></tr><tr><td style="width: 599px;"><span style="font-weight: 400;"> LV VG Attr LSize Pool Origin Data% Meta% Move Log Cpy%Sync Convert</span>

<span style="font-weight: 400;"> root linux -wi-ao---- 3,11g</span>

<span style="font-weight: 400;"> srv linux -wi-ao---- 956,00m</span>

<span style="font-weight: 400;"> swap linux -wi-ao---- 488,00m</span>

</td></tr></tbody></table>

<span style="font-weight: 400;">Visão geral do sistema de arquivos:</span>

<table id="bkmrk-%24-df--hp-sist.-arq.-" style="height: 290px;" width="600"><tbody><tr><td style="width: 599px;"><span style="font-weight: 400;">$ df -hP</span>

</td></tr><tr><td style="width: 599px;"><span style="font-weight: 400;">Sist. Arq. Tam. Usado Disp. Uso% Montado em</span>

<span style="font-weight: 400;">udev 487M 0 487M 0% /dev</span>

<span style="font-weight: 400;">tmpfs 100M 4,6M 96M 5% /run</span>

<span style="font-weight: 400;">/dev/mapper/linux-root 3,0G 2,2G 725M 75% /</span>

<span style="font-weight: 400;">tmpfs 499M 0 499M 0% /dev/shm</span>

<span style="font-weight: 400;">tmpfs 5,0M 0 5,0M 0% /run/lock</span>

<span style="font-weight: 400;">tmpfs 499M 0 499M 0% /sys/fs/cgroup</span>

**/dev/mapper/linux-srv 925M 2,4M 859M 1% /srv**

<span style="font-weight: 400;">/dev/sda1 472M 37M 411M 9% /boot</span>

<span style="font-weight: 400;">tmpfs 100M 0 100M 0% /run/user/1000</span>

</td></tr></tbody></table>

- <span style="font-weight: 400;">Configurações de rede. Os IPs devem ser trocados de acordo com a rede de cada campi:</span>

<table id="bkmrk-%24-nano-%2Fetc%2Fnetwork%2F" style="height: 316px;" width="350"><tbody><tr><td style="width: 349px;"><span style="font-weight: 400;">$ nano /etc/network/interfaces</span>

</td></tr><tr><td style="width: 349px;"><span style="font-weight: 400;">\# A interface de loopback</span>

<span style="font-weight: 400;">auto lo</span>

<span style="font-weight: 400;">iface lo inet loopback</span>

<span style="font-weight: 400;">\# A interface de rede primaria</span>

<span style="font-weight: 400;">auto ens33</span>

<span style="font-weight: 400;">allow-hotplug ens33</span>

<span style="font-weight: 400;">iface ens33 inet static</span>

<span style="font-weight: 400;"> address 172.16.1.10/24</span>

<span style="font-weight: 400;"> gateway 172.16.1.1</span>

<span style="font-weight: 400;"> dns-nameservers 172.16.1.6</span>

<span style="font-weight: 400;"> dns-search ifpe.edu.br</span>

</td></tr></tbody></table>

Informações das interfaces:

<table id="bkmrk-%24-ip-a-1%3A-lo%3A-%3Cloopb" style="height: 320px;" width="600"><tbody><tr><td style="width: 686px;"><span style="font-weight: 400;">$ ip a</span>

</td></tr><tr><td style="width: 686px;"><span style="font-weight: 400;">1: lo: &lt;LOOPBACK,UP,LOWER\_UP&gt; mtu 65536 qdisc noqueue state UNKNOWN group default qlen 1</span>

<span style="font-weight: 400;"> link/loopback 00:00:00:00:00:00 brd 00:00:00:00:00:00</span>

<span style="font-weight: 400;"> inet 127.0.0.1/8 scope host lo</span>

<span style="font-weight: 400;"> valid\_lft forever preferred\_lft forever</span>

<span style="font-weight: 400;"> inet6 ::1/128 scope host</span>

<span style="font-weight: 400;"> valid\_lft forever preferred\_lft forever</span>

<span style="font-weight: 400;">2: ens33: &lt;BROADCAST,MULTICAST,UP,LOWER\_UP&gt; mtu 1500 qdisc pfifo\_fast state UP group default qlen 1000</span>

<span style="font-weight: 400;"> link/ether </span>**00:0c:29:94:08:8d**<span style="font-weight: 400;"> brd ff:ff:ff:ff:ff:ff</span>

<span style="font-weight: 400;"> inet 172.16.1.10/24 brd 172.16.1.255 scope global ens33</span>

<span style="font-weight: 400;"> valid\_lft forever preferred\_lft forever</span>

</td></tr></tbody></table>

- <span style="font-weight: 400;">Usuários ativos. Sugere-se a troca das senhas:</span>

<table id="bkmrk-usu%C3%A1rio-%C2%A0senha-cgt" style="width: 350px; height: 118px;"><tbody><tr><td style="width: 174.5px;"><span style="font-weight: 400;">Usuário</span>

</td><td style="width: 174.5px;"><span style="font-weight: 400;"> Senha</span>

</td></tr><tr><td style="width: 174.5px;"><span style="font-weight: 400;">cgti</span>

</td><td style="width: 174.5px;"><span style="font-weight: 400;">\*@tif0cr</span>

</td></tr><tr><td style="width: 174.5px;"><span style="font-weight: 400;">root</span>

</td><td style="width: 174.5px;"><span style="font-weight: 400;">&amp;\_p0i3TJ</span>

</td></tr></tbody></table>

<span style="font-weight: 400;">Grupos ativos:</span>

<table id="bkmrk-grupo-usu%C3%A1rio-membr" style="height: 153px;" width="350"><tbody><tr><td style="width: 174px;"><span style="font-weight: 400;">Grupo</span>

</td><td style="width: 175px;"><span style="font-weight: 400;">Usuário membro</span>

</td></tr><tr><td style="width: 174px;"><span style="font-weight: 400;">cgti</span>

</td><td style="width: 175px;"><span style="font-weight: 400;">cgti</span>

</td></tr><tr><td style="width: 174px;"><span style="font-weight: 400;">root</span>

</td><td style="width: 175px;"><span style="font-weight: 400;">root, cgti</span>

</td></tr><tr><td style="width: 174px;"><span style="font-weight: 400;">sudo</span>

</td><td style="width: 175px;"><span style="font-weight: 400;">root, cgti</span>

</td></tr></tbody></table>

- <span style="font-weight: 400;">O diretório mapeado como exemplo para OCR é </span><span style="font-weight: 400;">/srv/shares/cgti/ocr/entrada/</span><span style="font-weight: 400;">. A CGTI deve criar os novos diretórios e mapeamentos de acordo com a sua necessidade. </span>

<span style="font-weight: 400;">A estrutura dos diretórios:</span>

<table id="bkmrk-%24-tree-%2Fsrv-%2Fsrv-%E2%94%94" style="height: 220px;" width="350"><tbody><tr><td style="width: 349px;"><span style="font-weight: 400;">$ tree /srv</span>

</td></tr><tr><td style="width: 349px;"><span style="font-weight: 400;">/srv</span>

<span style="font-weight: 400;">└── shares</span>

<span style="font-weight: 400;"> ├── cgti</span>

<span style="font-weight: 400;"> └── ocr</span>

<span style="font-weight: 400;"> ├── </span>**entrada**

<span style="font-weight: 400;"> ├── originais</span>

<span style="font-weight: 400;"> └── saida</span>

</td></tr></tbody></table>

*<span style="font-weight: 400;">Trigger</span>*<span style="font-weight: 400;"> do Watchman criada para o diretório em questão:</span>

<table id="bkmrk-%24-cat-%2Fusr%2Flocal%2Fvar" style="height: 817px;" width="349"><tbody><tr><td style="width: 348px;"><span style="font-weight: 400;">$ cat /usr/local/var/run/watchman/root-state/state</span>

</td></tr><tr><td style="width: 348px;"><span style="font-weight: 400;">{</span>

<span style="font-weight: 400;"> "watched": \[</span>

<span style="font-weight: 400;"> {</span>

<span style="font-weight: 400;"> "triggers": \[</span>

<span style="font-weight: 400;"> </span>**{**

 **"command": \[**

 **"/srv/doOcr.sh"**

 **\],**

<span style="font-weight: 400;"> "expression": \[</span>

<span style="font-weight: 400;"> "anyof",</span>

<span style="font-weight: 400;"> \[</span>

<span style="font-weight: 400;"> "match",</span>

<span style="font-weight: 400;"> </span> **"\*.pdf",**

<span style="font-weight: 400;"> "wholename"</span>

<span style="font-weight: 400;"> \]</span>

<span style="font-weight: 400;"> \],</span>

<span style="font-weight: 400;"> "stdin": \[</span>

<span style="font-weight: 400;"> "name",</span>

<span style="font-weight: 400;"> "exists",</span>

<span style="font-weight: 400;"> "new",</span>

<span style="font-weight: 400;"> "size",</span>

<span style="font-weight: 400;"> "mode"</span>

<span style="font-weight: 400;"> \],</span>

<span style="font-weight: 400;"> "name": "ocrTrigCgti",</span>

<span style="font-weight: 400;"> "append\_files": true</span>

<span style="font-weight: 400;"> }</span>

<span style="font-weight: 400;"> \],</span>

<span style="font-weight: 400;"> </span>**"path": "/srv/shares/cgti/ocr/entrada"**

<span style="font-weight: 400;"> }</span>

<span style="font-weight: 400;"> \],</span>

<span style="font-weight: 400;"> "version": "4.9.0"</span>

<span style="font-weight: 400;">}</span>

</td></tr></tbody></table>

<span style="font-weight: 400;">Arquivo do Watchman para configuração presente de forma obrigatória no diretório “entrada”:</span>

<table id="bkmrk-%24-cat-%2Fsrv%2Fshares%2Fcg" style="height: 73px;" width="350"><tbody><tr><td style="width: 349px;"><span style="font-weight: 400;">$ cat /srv/shares/cgti/ocr/entrada/.watchmanconfig</span>

</td></tr><tr><td style="width: 349px;"><span style="font-weight: 400;">{"settle": 10000} </span>

</td></tr></tbody></table>

### Como importar a VM no ambiente VMWARE

Neste método de importação será utilizado o ambiente vSphere Client versão 6.0.0, disponível em [https://kb.vmware.com/s/article/2089791](https://kb.vmware.com/s/article/2089791). O ESXi utilizado é da versão 6.5.0. Certifique-se de ter instalado o vSphere Client na sua máquina para ter sucesso neste método.

Baixe a OVA: [https://drive.google.com/file/d/1E20S31VW41\_Pu9jc\_MTfURKJRmmmmi2C/view?usp=sharing](https://drive.google.com/file/d/1E20S31VW41_Pu9jc_MTfURKJRmmmmi2C/view?usp=sharing)

<span style="font-weight: 400;">Realize o </span>*<span style="font-weight: 400;">login</span>*<span style="font-weight: 400;"> no ambiente com suas credenciais:</span>

 [![image7.png](https://wiki.ifpe.edu.br/uploads/images/gallery/2018-04-Apr/scaled-840-0/image7.png)](https://wiki.ifpe.edu.br/uploads/images/gallery/2018-04-Apr/image7.png)

<span style="font-weight: 400;">Após logar, clique em </span>*<span style="font-weight: 400;">File</span>*<span style="font-weight: 400;"> e em seguida, clique </span>*<span style="font-weight: 400;">Deploy OVF Template</span>*<span style="font-weight: 400;">:</span>

<span style="font-weight: 400;">[![image2.png](https://wiki.ifpe.edu.br/uploads/images/gallery/2018-04-Apr/scaled-840-0/image2.png)](https://wiki.ifpe.edu.br/uploads/images/gallery/2018-04-Apr/image2.png)</span>

Na próxima janela, clique em Browse para procurar o arquivo OVA:

[![image9.png](https://wiki.ifpe.edu.br/uploads/images/gallery/2018-04-Apr/scaled-840-0/image9.png)](https://wiki.ifpe.edu.br/uploads/images/gallery/2018-04-Apr/image9.png)&lt;&gt;

<span style="font-weight: 400;">Selecione o arquivo e clique em Abrir:</span>

<span style="font-weight: 400;">[![image1.png](https://wiki.ifpe.edu.br/uploads/images/gallery/2018-04-Apr/scaled-840-0/image1.png)](https://wiki.ifpe.edu.br/uploads/images/gallery/2018-04-Apr/image1.png)</span>

<span style="font-weight: 400;">Na próxima janela clique em </span>*<span style="font-weight: 400;">Next</span>*<span style="font-weight: 400;">, e observe os detalhes da VM:</span>

<span style="font-weight: 400;">[![image4.png](https://wiki.ifpe.edu.br/uploads/images/gallery/2018-04-Apr/scaled-840-0/image4.png)](https://wiki.ifpe.edu.br/uploads/images/gallery/2018-04-Apr/image4.png)</span>

<span style="font-weight: 400;">Selecione o nome desejado para VM e clique em </span>*<span style="font-weight: 400;">Next</span>*<span style="font-weight: 400;">.</span>

<span style="font-weight: 400;">[![image5.png](https://wiki.ifpe.edu.br/uploads/images/gallery/2018-04-Apr/scaled-840-0/image5.png)](https://wiki.ifpe.edu.br/uploads/images/gallery/2018-04-Apr/image5.png)</span>

<span style="font-weight: 400;">Selecione o </span>*<span style="font-weight: 400;">storage</span>*<span style="font-weight: 400;"> do ESXi no qual os arquivos do objeto da VM serão armazenados e clique </span>*<span style="font-weight: 400;">Next</span>*<span style="font-weight: 400;">. Na janela seguinte, clique </span>*<span style="font-weight: 400;">Next</span>*<span style="font-weight: 400;"> mais uma vez.</span>

<span style="font-weight: 400;">[![image11.png](https://wiki.ifpe.edu.br/uploads/images/gallery/2018-04-Apr/scaled-840-0/image11.png)](https://wiki.ifpe.edu.br/uploads/images/gallery/2018-04-Apr/image11.png)</span>

<span style="font-weight: 400;">Agora realize o mapeamento da rede interna criada no ESXi. Na coluna </span>*<span style="font-weight: 400;">Destination Networks</span>*<span style="font-weight: 400;"> deverá existir o nome da rede aplicada no ESXi local, selecione apropriadamente de acordo com o seu ambiente. No caso em tela, a rede de destino possui o mesmo nome.</span>

<span style="font-weight: 400;">[![image3.png](https://wiki.ifpe.edu.br/uploads/images/gallery/2018-04-Apr/scaled-840-0/image3.png)](https://wiki.ifpe.edu.br/uploads/images/gallery/2018-04-Apr/image3.png)</span>

<span style="font-weight: 400;">Estamos quase lá, agora observe as configurações selecionadas. Clique em </span>*<span style="font-weight: 400;">Finish</span>*<span style="font-weight: 400;"> quando tiver certeza do que será aplicado.</span>

<span style="font-weight: 400;">[![image10.png](https://wiki.ifpe.edu.br/uploads/images/gallery/2018-04-Apr/scaled-840-0/image10.png)](https://wiki.ifpe.edu.br/uploads/images/gallery/2018-04-Apr/image10.png)</span>

<span style="font-weight: 400;">A VM começará a ser importada:</span>

<span style="font-weight: 400;">[![image12.png](https://wiki.ifpe.edu.br/uploads/images/gallery/2018-04-Apr/scaled-840-0/image12.png)](https://wiki.ifpe.edu.br/uploads/images/gallery/2018-04-Apr/image12.png)</span>

<span style="font-weight: 400;">A operação pode levar algum tempo. A seguinte tela surge quando concluído.</span>

<span style="font-weight: 400;">[![image6.png](https://wiki.ifpe.edu.br/uploads/images/gallery/2018-04-Apr/scaled-840-0/image6.png)](https://wiki.ifpe.edu.br/uploads/images/gallery/2018-04-Apr/image6.png)</span>

<span style="font-weight: 400;">Pronto, a VM está pronta para uso.</span>

<span style="font-weight: 400;">[![image8.png](https://wiki.ifpe.edu.br/uploads/images/gallery/2018-04-Apr/scaled-840-0/image8.png)](https://wiki.ifpe.edu.br/uploads/images/gallery/2018-04-Apr/image8.png)</span>